Follow me on pinterest

Follow Me on Pinterest

Wednesday, August 8, 2012

A Bridal Backdrop - VERY CHEAP for a fussy bride =)


My daughter didn’t want to use the bridal backdrop that is in my family, the very nice one my brother made years ago, that has been used for many of my nieces and nephews  weddings, has been repainted and is still looking great! I told her we could make it look cute using her icicle Christmas lights with sheer cloth over them draped over the top. She still didn’t like it. She said it looked like a “fence.” Having looked on about every website possible, trying to think up original ideas or things that you might hang stuff from, and knowing that bridal backdrops cost a fortune (and I really had no budget) I was frustrated… as usual. Really? Typical day living with my very own BRIDZILLA daughter. But come on, she will only get married once! She’s a very beautiful, princessy girl who deserves MUCH love and fuss from her mommy! And may I add that I was SO HAPPY that she found THE GUY and would be able to begin her happily ever after?
We found different ideas for cute things that hang, but I just couldn’t figure out HOW we’d hang them! I even emailed the brother that made the family bridal backdrop to ask if he had any ideas. He didn’t answer, and I wouldn’t have either! I’m not a wood craftsman and couldn’t figure out how to hammer boards together to make a decent looking frame.
I got this idea from looking at a photographer’s site. He used PVC pipe to make a backdrop that he used to hang a curtain from. I also learned that a length of 6 feet is the longest that a joint can support. My daughter wanted her backdrop to be longer than 6 feet, so I decided to put a post in the middle to double it.
If we had more money to spend I would have bought some really big vases and either rocks or marbles to fill them to stand the PVC in. But needing to be super CHEAP, I decided  to use T-joints to make stands on the floor. Not the most stable thing, but it worked! (Just had to stand it back straight a couple of times when kids ran through the fun decorations.)
One more thing I should explain. Instead of having the guy at Lowes cut the pipe into 6 foot pieces, I bought 2 foot pieces that were already cut, along with 2 straight joints to make each 6 foot section. The idea behind that 1) it wouldn’t require a huge truck or trailer to haul the pipes and 2) the backdrop could be easily carried in a bag (not plastic – too heavy. I used a strong T-shirt bag).
Since I don’t have great pictures of the whole thing I’ll explain the best I can.  
I bought 15 2-foot pieces. (I chose 1 inch thick.) Three for each 6 foot section – three posts and two across the top. I bought 2 corners – for the corners (duh!). I bought 4 T-joints. One to join the middle of the backdrop where there would be an extra post to hold it up, and 3 to put at the bottom of the posts to make it stand up. (Also 10 straight joints to help form the straight posts and top - 2 for each 6 foot piece).
Kayli  decided she’d like GOLD for the color – not typical white and weddingy. I spray painted the pipes and joints gold. It was HILARIOUS because I was having a lovely, very crippled kind of day, so I took the PVC, cardboard to spray on(I really should have just let he grass be gold!) and spray paint to the side of our house so hopefully the neighbors wouldn’t see me. I was having a “mumu” kind of day and was also using my cane to hobble around. I managed to get myself and all the stuff to the side of the house. The pipes kept trying to roll all over the cardboard… the bit of wind blowing didn’t help!  I tried my best to get them to sit still long enough to get one side sprayed. Incidentally, my grandson thought it would be fun to take my cane and run away with it! Hilarity ensued, as I tried to “chase” him, even though I was having a crippled, hobbling day, and I couldn’t run at all, or hardly walk. He took my BRAND NEW cane and had banged it against the brick on the next door neighbor’s house several times before I caught up to him. My black handle was all scuffed and ugly. Oh well. He enjoyed it very much! And black marker DOES cover scuffs on black handles. =)
The pipes dried quickly so I sprayed the other side. They didn’t get perfectly covered since I didn’t feel  good enough o make them perfect.
I ordered some gold, sparkly tulleribbon from papermart. My daughter chose some pretty beads that I found onAmazon. She made some small tissue paper flowers in her wedding  colors and attatched them to fishing line. I bought a few silk flowers in her colors that I thought I’d add to the sides. When  we ordered our rental things, I ordered some extra ties for the chairs in case we wanted them for other decorating.
Assembly:
1.       Putting PVC pipe together and adding ribbon. At the church (still feeling VERY crippled) I sat on the floor to put the pieces together – very easy to do when you’re dealing with 2 foot PVC pieces! Assembly was very quick! Then I used the sparkly glitter tulle ribbon, tied (or pinned) it to the bottom of each stand, then I wrapped it around and around, winding the ribbon up, around the corners and continuing until all of the stands and top were covered. Not only was this pretty, but it covered up the not-so-perfectly painted spots and gave me something to pin decorations to.
2.       I spaced the strands of tissue paper flowers by draping them over the top, while I adjusted them evenly. I then pinned the top flower right through the tissue to the tulle ribbon.
3.       The crystal bead came on a roll that was 90 feet long. I cut them in something like 5 foot lengths. As many as I could get out of the roll. I put them in between the flowers and had one left. I cut it in half then put the halves by the pole ends. I pinned these to the back side of the poles, then draped them over so the pins wouldn’t show.
4.       I took the silk flowers, divided them so they’d be the same for each side, put them together, sort of in bouquet form with green floral tape to hold them together. Then I wrapped more gold tulle through the flowers, attaching them to the posts.
5.       I was going to use a couple of the chair ribbons on the corners, but my son-in-law’s brother happened to be better at decorating than I was (seriously!) so he put two colors together to make really pretty bows!

TaDa! I really wish I had better pictures… but hopefully you get the idea from the corners and from the cute picture of my granddaughter, my daugher and her cute husband in front of some of the pretty beads and flowers!


 Oh, and that's me peeking here in the green dress in the corner!


Friday, July 27, 2012

Top Ten Mother-Of-The-Bride Worries


1.Don't offend the bride
1.b. When you do, make it up to her by buying something ridiculously expensive (or super creative, to seem ridiculously expensive) for her wedding.
 (After seeing how expensive cake toppers are, I made this of Kayli & Peter.
Trust me, painting something that tiny is hard! And getting tissue paper to
work when making tiny flowers, a bouquet and the ruffly skirt... impossible!)

2.Buy a zillion silk flowers and ribbon in the colors of the reception.
2.b.When the bride changes her mind, buy a zillion more flowers and more ribbon.


3.Try to make the ugly dress you ordered to wear as mother-of-the-bride work, even though it’s PURPLE and not a pretty shade of red (raspberry), has tacky rhinestones instead of beading and it doesn’t fall loosely like the dress online. (Save for fall when someone might buy it online for Homecoming Dance season.)
3.b. Sew a dress using a cute pattern. (When it turns out to look very homemade and not fancy enough for a special occasion, hang in closet to use for summer dress.)
3.c.In desperation find one at JC Penney with slit sleeves. Order online so it’s in your size. Sew seams together and attach to the bottom of sleeves to make modest.
3.d.Purchase tattoo cover up since the back of the dress has a V-neck and your tattoo clashes with the color of the dress
  
(One to show my third dress, with sleeves fixed to be mode st. Actually showing off my darling grandson - Gavin enjoying a cupcake with his Grammy!)


4. Watch youtube videos to learn how to make fondant and all that other crap that you swore you’d never do – anything to please your little “princess!”

5.  Find exactly the right frosting tip.
5.b. When the frosting tip is too difficult and takes too much frosting, talk the bride into spreading the frosting by blackmailing her that you will make pretty fondant flowers for the tops of the cupcakes.

6.  When she changes her mind about using limes in the centerpieces… feel frustrated. Wait. Buy limes, put them in vases with some of her flowers to show her how much she really wants them!


7. Make bouquets, including an extra one to throw. Also, one for the miniature maid of honor.
7.b. Make mother’s corsages, father’s, grooms and best man’s boutonnieres.
7.c.Make several bouquets from the remaining flowers to decorate the reception. And DO use all the flowers that are in the wrong colors, because together they look SO BEAUTIFUL!


8. Try not to be sick when all you want to do is lie in bed.
8.b. Give up and order receptions items on the internet.
8.c. Worry about how you’ll be at the wedding in your condition, even if you have to resort to buying a wheelchair and a cane.
8.d. When you KNOW you’ll never survive the entire wedding in one day (but your daughter is stubborn and insists) get creative. Offer the bride and groom a very nice, romantic, theme suite for their wedding night – they’re choice! Even when they pick one that is twice what you planned on paying. Check out Romeo's Retreat.

9. When the company who is making the bridal gown emails you (after taking a month and a half to make the gown) that the shoulder measurement is an inch and a half too small so they have to start over, breath. Then email them back saying, “HURRY FAST!” And hope they get it sewn and shipped as fast as they did for me. We had time to have it pressed, which took the cleaners a week.

10. Get smart and ask kind family members to bake the cupcakes when the bride runs out of time.
10.b.Somehow ignore the pig mess in your house when wedding guests come to your very small, wedding-stacked house, along with the dirty bathroom, to help frost the cupcakes.

(This is my sweet daughter, Laci who was a WHIZ at cupcakes!)


 Okay, let’s get REAL. TEN??? Seriously?

11.Try not to show your witchy side every time the groom is over, which is every day.
11.b.Try to genuinely accept the apologies he makes when the bride doesn’t appreciate the job you are doing.
11.c. When the groom tells your daughter on the Sunday before the wedding that he told his parents t “they,” meaning your daughter and him will take care of the wedding luncheon – DON’T FREAK OUT! Sure, you thought his family had it handled. Kindly tell you daughter to go ahead and order a platter and some rolls from Costco. Accept donations of paper plates, etc from your very kind sister. Try not to think about it. 
 

12.  Even though you’ve practiced the cake, butter cream icing and fondant many times, when the REAL cake has every possible unfortunate thing happen, don’t panic. Yes, you may be heard saying, “I will NOT be there when she eats that wedding cake!” And you may totally mean it! (Notice my "concerned" look while they cut the cake.) And honestly, when you open the box holding the fondant covered layers to find that a piece of fondant STUCK to the lid of the box… remember your own wedding day and all the disasters! Try everything you can think of… then fill in the hole with white butter cream icing (that you 
have handy to assemble the cake and attach 
the flowers) to fill in the hole and hope no 
one actually looks at the cake.


13. When you’ve made it past the wedding and are still alive at the luncheon, feel the joy! At least until you discover your ankles are as thick as an elephants and you can’t walk, move, or feel your feet. Kindly ask your other very helpful and loving daughter if she can quickly get you home! Prop those ankles higher than your heart with ICE for the remainder of the day and HOPE you’ll make it to the reception.
 
14. Even though you’re at the wedding reception with dead feet sitting in a wheel chair, smile and enjoy the abundance of guests who keep surprising you when they show up! Try not to cry  when you’re daughter dances with her daddy to his favorite singer – Bryan Adams: Everything I Do. Great choice Kayli. You actually got that Daddy of yours to dance AND cry too!


15. Live for the day when all wedding preparations, events, decorating then taking down decorations when the reception is over. Relax. Breath. Think about being alone with your honey, eating less, having smaller power/gas bills and enjoying the freedom to see a movie and buy a stake/lobster dinner.

A NOTE: I am leaving out MANY things. When I look over the log I kept of money spent on the wedding, I remember the stress and horrors of preparing... and getting through bridezilla moments. This engagement seemed like FOREVER, even though it was actually more like 4 months. Okay, this was not just a wedding. My daughter was going through a rough semester of school,  both she and her fiancé looked for new jobs then changed occupations, there was an entire family involved  - not just a bride and groom (my 2 grandkids were getting a Daddy), and they moved to another city… 

EVERY BIT OF IT WAS WORTH THE HAPPINESS of something SO RIGHT!

(Table displaying "Our Story: Peter & Kayli")
 My WHOLE family! All kids and grandkids =)


Sunday, July 22, 2012

Grammy's Fashion Doll Makeover


The wedding is over! Now time for me to be a REAL Grammy! No more "parenting" or having to discipline grandkids. I get to be a regular, NICE, fun Grandma! When my granddaughter asked me HOW I was going to spend my time, when there was no one here but Grandpa and I, most of the house was bare with so much of their furniture gone, and no grandkids to take care of, I told her I had a couple of things in mind. I told her I planned to learn some more Spanish. And a fun project I had in mind was to find my box of Barbies from the garage, bring them inside, and give the icky, old ones haircuts! When I had time to go find my box of Barbies, I had forgotten that our chocolate lab, Sampson had found my box one winter and dragged all of the Barbies and all of their clothes all over the yard. I managed to find most of them, but some that were chewed and broken were thrown away. Poor Joey, one of my remaining NKOTB dolls had been surviving by having one his legs duct taped on. He went into the garbage with other chewed up Barbies. I was happy that my favorite ones, the ones I'd been given for Christmases or bought myself were safe. All of the Barbies (plus Kens and NKOTB dolls) were muddy and in bad need of baths and shampooing, plus hair treatments to restore icky, matted hair. They went into the sink with some Woolite. Also, I'm sure none of the clothes had ever been washed, so I put all the clothes (except leather or fur) in a bowl with cold water and Woolite.

Next came rinsing of dolls and WHAT to do with their hair. I remembered a couple of ideas I'd seen on Pinterest. Both used liquid fabric softner, which I didn't have, and one mentioned a wire wig brush. I didn't have that either. But when cleaning out my closet after my daughter and her kids moved, I did find a never-been-used pet brush that had a wire side. First I tried using the wire pet brush with some hair oil that I use to help brush out my own wet hair. This seemed to work really well. I did notice the doll hair took overnight to dry out this way. But I really like the results!
Then I tried wringing out the wet doll hair and using dryer sheets which I wiped through the wet hair and then used the wire pet brush. The hair easily brushed out. Both ways worked great, and the icky, tangled hair brushed out.These dolls are pulling a "Lady Godiva" by trying to cover up. Shakira is even lending her microphone to help her friend be modest.
I rinsed out the clothes in cold water and placed them on a towel to air dry. Clean clothes would be great for grandkids to play with!
Now to decided what to do with all those short skirts and tops that don't cover tummies and other parts of dolls tops that my granddaughter are learning to cover when dressing themselves, by using t-shirts and leggings. Time to use another tip I'd seen on Pinterest. This came in handy for BOTH the girls and boy dolls. My Ken dolls has all come in swim suits, which had ripped crotches. My KKOTB dolls had fake jeans that had ripped crotches too. Another was NKOTB dolls all had jackets or sweaters, but had open chests. Time for boys to be modest too!
Yes, nail polish did a good job covering all the dolls so that even when younger grandkids rip all the clothes off, the dolls will still be "dressed." It was fun during the "painting" process watching the Barbies "exercise" and the boy dolls go through superhero training while drying!


Now for the matter of one of my finds, when I opened my box from the garage. I was suprised to pull out this princess doll. I have to say here that I have NO PROBLEM with my granddaughters having princess dolls, or being very princessy! They are adorable and I love little princesses! It's just that I have never been princessy. So when I found this doll, I knew she was a cast off from a toy cleaning out, giving away project my daughter had done, and this doll made her way to my box. My first instinct was to throw her away. (The picture is after her hair was washed. She was much worse before. I actually took this dress out of my garbage to take this picture.) But I decided that maybe there was hope for her, if I gave her a good make-over. Here's she is before and after:


                    Meet my EMO girl. Much MUCH better!


I'm not an obsessive doll collector but I DO like fashion, hair and makeup. The fun thing about having clean hair on Barbies is you can do so much! I gave them all at least a trim. Plus several of them got shorter cuts. If you want to add bangs, don't cut them. But do try eye pencil bangs! Also, powder eye shadow can be used as highlights in hair. I added eye pencil to all but two of the girls since I didn't like the old, light colored makeup, and I like the eyes to look a bit larger. Makeup and hair product work well on Barbies because it can be washed out. I should add that once the hair is cleaned and brushed out with a wire brush, plus ends are trimmed, it's easy to do different hairstyles. All it takes is a water in a spray bottle to spray, comb out with a regular comb and you can start again. If you like back-coming that's a fun thing to try also. I used some little clear hair elastics to attach some bangs behind heads and to make pig tails.

This is also showing how clothes work with the modest nail polish covering. Mini skirts or shirts that don't quite cover and be used now. I also like the look of the nail polish so much that I didn't dress them all.


Here are my two favorite dolls. One is Shakira. I was worried about washing her hair because it is so pretty with the long curls. I found that any doll with curly hair stayed curly! Even my doll that has crimping, which you'll see later. This other doll I love because she's the closest thing to having red hair - my obsession since I was little. They are hard to find now. I guess I could buy Ariel and give her a make-over!


Ready for more? It's SUPERHERO TIME!


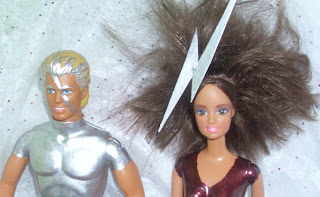
This Ken was not my favorite before. I loved the added "tights," the silver shirt and the silver highlights and across his face! This Barbie was pretty boring before. The darker polish, makeup, plus hair cut (and LOTS of playing with her hair) really made her so much cooler!


Surfer Barbie and Ken both needed hair cuts and look SO MUCH cooler when painted. They both transformed to SUPERHEROS. Watch out for what they'll do with that board!


This Barbie is Eva Longoria to me! I gave her a layered cut. Her hair was so uneven before. Jonathan looked so great after his blue and silver paint! Parts of his hair was worn off so I added the silver highlights. He was actually my FIRST SUPERHERO. He inspired the others. These pics are cheesey, since they both look much cooler without the foil skirt and cape. But my husband liked them. He had me put a foil mask on Jonathan, but I didn't love it. I'm just showing what you can do, and if I had cloth that matched I might be tempted to get more creative with costumes.


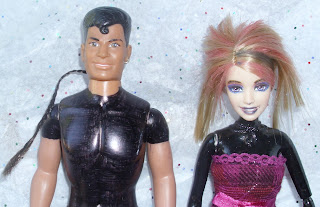
Jordan had worn hair too. I covered it with black marker. Jordan's weapon is his tail! He can lasso, whip and strangle an enemy with that thing! Won't I have fun trying to explain his tail to my grandkids? I just had to add my Emo Girl to this.


Note: The legs of all the dolls are rubbery, so nail polish will feel sticky. Pants will probably stick to legs and polish may come off. Also, if you throw all the dolls into the same bag, expect them to rough-house while you're not looking, and you will find their colors on each other. (Boys will be boys, but girls get pretty catty when they get by together.) If you have an OCD granddaughter like mine, you'll want to keep polish near for quick fixes. I have learned to put them away in tissue layers or separate bags.

Bring on the grandkids! Grammy is ready for a sleepover SOON!

Sunday, July 8, 2012

Just in time! My alligator skin is thankful - Sugary Citrus Scrub


Hurray for new but melted coconut oil! I’ve been really in need of more sugar scrub (the six containers that my cute niece Nicole made with me were very nice – made with sugar, olive oil, and each one scented with a different essential oil, but are used up). I use about 2 - 54 oz containers of extra virgin coconut oil each month, for dietary reasons, well health plus wonderful skin moisturizers and just about any skin-related problem. When my package came today it was completely melted, due to the extreme temperatures across the country this week. Oh good – I’ve been wishing for a bit of melted coconut oil to make a quick concoction of sugar scrub! Yes, I could have melted it, but with my daughter’s wedding  just three days away, I’ve been thinking how wonderful it would be to just FIND melted coconut oil. So yeah!
 No nice background tonight! Will have to do with wedding flowers!
I had a 4 oz jar, so poured sugar into it (I’m typically not an exact measurement kind of gal) to fill it most the way up, then dumped the sugar in a small mixing bowl. I poured in some melted coconut oil then added three citrusy essential oils: lemon, lime and tangerine. I probably doubled the citrusy oils (perhaps 6 – 9 drops of each), since I like the smell a bit stronger. The citrusy scent of this is so invigorating!

I immediately used the leftovers in the bowl to exfoliate my face. Then tonight I had a shower, shaved then scrubbed away my dry alligator skin that I’ve neglected so far this dry, hot Utah summer! What I love about making it with coconut oil is I don’t wash the scrub off with soap afterwards (just water). So my skin gets moisture from the coconut oil, and I don’t have to add the many lotions, creams and moisturizers that I typically do. The smell in the shower was just wonderful;  citrus and coconut sweetness!
 My very favorite coconut oil is from Vitacost.com, and comes in a very large jar – it’s almost gallon size! It’s a great deal, since other brands charge more, and even with paying for the cost of shipping, I still get this oil for the best price!

So nice to get this out of the way, since I’ve got a busy week ahead with decorating cupcakes, making the wedding cake and so many other things to be ready for the wedding! My skin is soft, moisturized and feels GREAT!

Sunday, May 27, 2012

Wedding Mistakes... You Should Not Make! My Dress

This is the dress. It comes in a variety of colors. The website says, "Modest Prom Special Occasion Dress with short cap sleeves. The waist is shirred and accented by a center cluster of beadwork. The T-length skirt is soft and flowing." People who know me think this picture looks like a dress I would wear. As the mother-of-the-bride. For a formal event.

The color I chose was "plum." Does this look plum to you? My daughter's wedding colors are a range of darker reds such as berries, fushia, etc. Also olive and moss green. But NOT purple. Purple purple purple. Am I crazy? This dress is SO PURPLE! Notice the "cluster of beadwork." Not. Those are cheap, tacky looking rhinestones. Also, the "soft and flowing" part don't apply. This dress is THICK, with a heavy lining, so there is NO flowing. It's also floor length, not with a pretty slightly higher hem, like the above picture. I thought that hemline would look nice on me, since I'm very tall with long legs. The hemline on this purple monster is heavy, crooked, and the front is not slightly raised, like the original picture. The dress is also very tight, which is unpleasant, and not acceptable for the entirety of a wedding reception. The measurements of the size I ordered should fit me perfectly. But nope. This dress would be a mess to have altered. Since it's not flowing, and doesn't resemble the picture, it would be a waste of money. Okay, it WAS a waste of money. This dress looks like a COSTUME, not a mother-of-the-bride dress on me.

Let's move on to another picture. This shows the dress with the slip it came with. The VERY FULL netting slip. The kind you wear with poufy prom or bridal dress. Also a view of the slip.
I tried very hard to make this picture pretty, by stuffing the bodice with tissue paper in all the right places, and fluffing out the skirt. Trying to make it look more promy. To pehaps sell it to make up for my loss. Can you SEE how uneven the hemline is? And that big clump of rhinestone just blinds me with tackiness.

Let's make this more fun! Here are the plum colored shoes I purchased to go with the dress. Don't they match so perfectly? And the nicest part is, the store I bought them from has a 30 day return for exchange or store credit policy. My daughter took them to be exchanged today (the 30 days are almost up). They said the shoes are scuffed, so I have worn them. Really? Cause I know I have LOTS of places I like to go wearing PLUM shoes... LOVE pink/plum whatever shoes. Really. Not.
But this wedding stuff is FUN! And on we go... and on we spend! Really, I'm super excited! Of course the suspense of what I'll actually wear is the FUNNEST!